Wednesday 3 July 2013

Using Film

As part of the media unit we had to try using film-both colour negative and colour transparency.

FILM...
Advantages
  • Image quality is better than digital. The resolution is higher and that means that more fine detail is recorded
  • Greater range of tones and better highlights in film
  • Good for long exposures (into the minutes) and can even do double exposure.
  • Creates hard copies and can do contacts that can be physically stored

Disadvantages
  • Slow process compared to digital and you have no way of seeing the results until they are developed
  • There is a middle stage (i.e. negatives) which doesn't exist for 
  • Very expensive hardware and film for good quality film cameras.
  • Film fades.
DIGITAL...
Advantages
  • Very fast process from pressing the shutter and seeing them on a screen seconds later and you can have prints done within about 5 minutes if you wanted to.
  • Easier to store images on disc and hard drives than boxes and cabinet like with film
  • Potential to take more photographs than film
  • Cheaper...you essentially by the hardware (which is cheaper than film anyway) and that is all you need (no film needed)
  • Can easily create backups ('tis the beauty of Copy and Paste!)

Disadvantages
  • Digital doesn't fade but hard drives and discs can be unreliable and you might lose your images so you end up having to have many backups which costs more and is more effort when backing up work,
  • Poor quality images unless you buy a really high-end DSLR which is horrendously expensive
Again, this is like the question which is better Matte or Gloss. There isn't really a correct answer only which is better for a particular situation. For example for landscape photography, film would be better however for perhaps sports photography it might be better to use a digital camera so you can take as many images as you like without worrying.about cost and whether they'll come out OK.

Of course 'film' isn't just one type of film, there are many different types and the two we looked at were colour negative (CN)  and colour transparency (CT)...

CN FILM: A strip of transparent plastic where the light areas are dark in the image and dark areas are light (hence 'negative')

Advantages
  • Good for highlights and shadows (greater range). This is called the exposure latitude and CN film has a wide exposure latitude
  •  Simpler to process
  • Relatively cheap
Disadvantages
  • Needs to be printed or scanned to see the results
CT FILM: A strip of transparent plastic where the light areas are light in the image taken and dark areas are dark (produces a positive image)

Advantages
  • No need to develop...the film is the final product.
Disadvantages
  • Narrow exposure latitude
  • Very complicated to process and often need to process them yourself at home because few places develop them for you.
  • Expensive
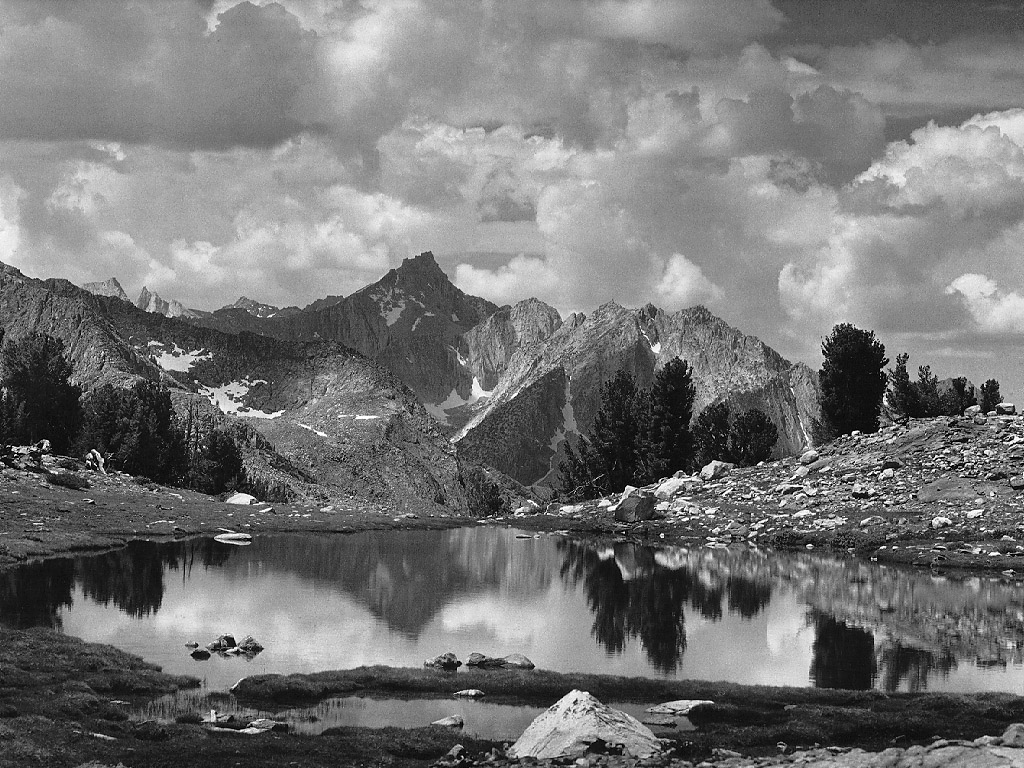
I thoroughly enjoyed using these two film techniques. When was given a roll of CN film and a Canon digital SLR to go out and photograph with I could really tell the difference  in the experience of using film compared to DSLRs. I loved the experience and I would love to pursue this in the future...perhaps when I have more comfortable financial means (basically I'm skint!). Here is a scan of the image that were produced from the CN film...


When we did the colour transparency image we had to think eve more about the settings, angle of view and the composition because we only had one shot each main;y because it was expensive and also we would have been fighting over the Large Format Camera (NB:See 'Camera Types' post for more information on Large Format). We had to ensure that the image was perfectly in the frame (which as someone not used to the inverted nature of the camera it proved more difficult than I care to admit). We even used a black cape thing on top of us to ensure that we could see the screen and check it was in focus.

Thursday 27 June 2013

Specialist Location: Final Images and Evaluation

After I finished the shoot I had to finish some work from other units so I wasn't able to take a good long look at them for a couple of weeks.  I sorted through them and when I chose my final images. I decided to use eight images because it fell within the 5-10 range I set myself previously and I think eight is a nice, well rounded number (six was too little, seven seemed clumsy and well nine is just absurd!). I edited them in PS, mainly to increase the vibrance a little just to give them a little kick. In some cases I tweaked the exposure as well. Here is a before and after of one of the images just to demonstrate what my editing entails..

                                       Before                                                     After

Here are my final eight...


When I set out to do this shoot my aim was as follows..."To produce a series of 5-10 images of the lake Ullswater in the lake district using my DSLR incorporating water into my images that I would feel comfortable exhibiting" and I feel like I have achieved this. I LOVE the images and I am very happy with the final result. I was a little worried about weather and whether I would like the scenery there; in fact my Plan B was to borrow a macro lens from college and do some landscape photography with that if things didn't work out! That said, everything worked out well in the end, so much so the waves in the 4th image was pure coincidence! As part of the end of the course, some of the students on my course, including myself, will exhibit our specialist location images and I am happy to do that as I feel that these images would work in that setting as that was one of my aims when producing them :)

However, if I were to do this shoot again I would want to spend more time perhaps two days instead of one. Also I would look at different lakes on different sides of the lake district. It would have been nice to try it with film however I decided against it because with me being new to landscape photography I didn't want to over complicate things for myself. With a DSLR you can look at your images there and then and get a general idea if you happy with the result. Also I wanted to check my images after the test shoot to make a final decision as to which lake I would use for my shoot. I was able to check the images that night on my laptop whereas that would have been impossible to do using film so perhaps I would spread the shoot over a longer period of time (e.g 10 days) to give myself a chance to develop my negatives and see the results of my test shoot in order to make an informed decision.

Playing around with motion blur would be interesting however I don't know how well that would work as lakes are quite still as opposed to streams and rivers that run. It would be interesting to see how the small ships and boats turn out though.

Something I would definitely like to try would be panoramic images. I considered it with this shoot but again I didn't want to over complicate things as my DSLR doesn't have a panoramic setting so I would end up having to borrow one which I didn't want to do because the last thing I needed on my first landscape photography shoot was a camera I wasn't used to! What I did however is I go two images I took on my test shoot at Windemere and stitched them together in PS to see what it would look like...


I was actually quite happy with this image and I think that it would make a really great series if I were able to master the panoramic setting on another camera!

Specialist Location: Plan & Test Shoot

First thing I did before writing the plan was to define my aim in the unit and carry out a  SWOT analysis on myself and my skills, identified ideas on what I could do for the unit and try to anticipate anything that might cause a problem later on in the process. Here is my SWOT analysis...

Aim: To Produce 5-10 images in the genre ‘Landscape Photography’ using my DSLR.


Strengths...
Mature
Enthusiastic
Determined
Independent
Weaknesses...
Forgetful and Clumsiness
Perfectionism
Poor Time Management
Opportunities...
Considering Landscapes
  • Peak District
  • Lake District
  • Yorkshire
  • South England (trip to the BEACH!!!)
Threats...
Weather/Available Light
Injury on Shoot


After I pre-empting threats the threats it helped with the planning because that way I could ensure that if things went a little wrong then I would have a solution or a backup plan. 

We then did presentations to the rest of the group telling everyone our plan and what we hope to achieve where they gave me feedback and ideas. This was a lot of fun because they would ask me questions and as I was answering them I could feel myself understanding my own concept better. What was really great was someone made me aware that the position of the sun differed at different times of the day which seemed really obvious but I hadn't actually considered it at that point...I'm sure it would have clicked eventually :) What I did was using a combination of common sense and an app I download on my phone (there really is an app for everything!) I was able to guess what the lighting conditions would be like in certain areas at certain times of the day!

I decided to do the shoot in the lake district because I felt that it would allow me to incorporate water easily and another option I had considered for this reason was South England however I ruled that out because it was a little too far away! Next I had to decide where I would go in the lake district i.e. which lakes I should go to. I researched on the internet and asked a couple of friends who had been and I narrowed it down to three lakes I would visit on my test shoot and then choose one for my real shoot...
Coniston (friends stayed there for a couple of days and said it was lovely)
Windemere (because it was the largest lake)
Ullswater (read somewhere on the internet it had the best views apparently)

I decided to spend 1 day on a test shoot and then do another shoot the next day for my final images once I have seen the area. I dragged my father along to give a lift to the lake district and take me around the lake district. We stayed there overnight for that second day of shooting.
I knew that I wanted to go sometime in late May/early June because apparently that's when you a lot of sunshine and not much amount of rain...if I wanted optimum weather I could have left it later but I needed time to edit them and submit them for my unit of course so I had to take that into account!. However when exactly I wanted to go wasn't actually planned. I didn't want to commit to certain days only for it to end up being a two day monsoon so I checked the weather regularly and luckily about 3 days in advance it said on BBC weather that the area would be clear and sunny over the weekend 8th/9th June, checked other websites just to be sure so my father and I set off that weekend very early in the morning to get as much sunlight as possible. 

Before I went I had to make sure that my equipment was all in order (e.g. cleaned my lens, charged both batteries, emptied memory cards, checked tripod was working etc). I also had to make sure I had maps printed off and also made note of car park postcodes (for the car obviously!). 

Going back to what I said earlier about predicting predicaments I ensured I took any safety precautions needed. I took a first aid kit (in case of injury) I took both walking shoes (to prevent me falling over and prevent blisters) and wellies (for standing in the lakes doy!). I also ensured that my father stayed with me at all times because I have a tendency to get lost...fall over and hurt myself...and drop stuff...and lose stuff...basically he was there to stop me for killing myself. Carrying on from my clumsiness, brought and change of clothes because I wouldn't be me if I didn't fall head first into at least one lake!

I was really lucky with the weather that weekend not only was it sunny, it was fabulously clear and even when it was cloudy they were very cute little clouds not thunderstorm like monstrosities. So all in all I was very happy with the weather. I tried all three lakes on the test shoot on Saturday here are a couple of images from each lake...

Coniston

Ullswater

Windemere

I liked the views on Coniston however it was a small lake so It didn't offer as much variety as the others. My issue with Windmere was simply that it wasn't a scenic as the other two. I felt the images I produced there weren't exactly what I wanted to achieve, plus it was too vast. Ullswater was fantastic because it was just right balance between Consiton and Windemere. It was large enough to offer a variety of beautiful locations and possible angles which I could photograph  but without being too big! So it was decided, the next day I set off for Ullswater again.

Specialist Location: Research

For my specialist location I had decided to do landscape photography mainly because I didn't much of an opportunity to do it this year and I felt like it would be perfect for my specialist location unit. Landscape photography, as the name suggests, is the photography of natural landscapes. Nature is often the focus however sometimes some man made structures can be incorporated. A common misconception of landscape photography is that it is of vast, open spaces which isn't necessarily the case. Yes, most landscape photography is of vast, open spaces and utilises wide angle lenses however you can take microscopic images using a macro lens and it could still be classified as 'landscape'. Also even though when you say landscapes you immediately think of rolling hills and trees, urban landscapes would also fall under the category 'landscape photography'. So really landscape photography is anything as long as the subject is the space/area you are photographing. It is apparent that this specialism of location photography encompasses a variety of techniques and processes.

I've always been interested in landscape photography so it'll be interesting to see if I like it as much in practise. What appeals to me about landscape photography is the fact that it is a specialism which allows you to work solo which isn't always the case with other genres such as fashion photography (you have models, makeup artists, set designers and clothes designers etc).  Also landscape photography can stand on its own i.e. the images aren't created for a specific purpose like say photojournalism (to go with the article/story) or documentary photography (to present and idea or view point).

I researched a few photographers in preparation for my shoot and here are the lucky six I've decided to include in the blog (NB: first three are historical photographers whereas the last three are more contemporary)...

1. Ansel Adams
I had a look at some of Ansel Adams work last year during the location photography unit but I think that his work is definitely worth another, more in depth look into his work. His work is all in B&W due to the fact he was working in the 1920's...it would have been quite interesting to see how the landscapes would have looked in colour! That said, I think they wouldn't have been as powerful. I personally like his images, the vastness of some of them are incredible. You just lose yourself in them and that is what I hope to achieve.Here are a couple of my favourites. 


I particularly love the one directly above because of the reflection in the body of water and i found myself liking the ones with water more and more. This led me to decide to include water in my images.

2. Fay Godwin
Her work is quite different to Ansel Adams in style, a major difference is the landscapes they photographed. Adams was fond of Yosemite National Park (being American) whereas because Godwin was British she mainly worked with British countryside and thus the end result is very different. I felt that Adams images were more powerful because with there being a lot of rock in his images, this worked well in monochrome. However, her compositions were also very interesting  because they weren't as macro as Adams. Here are some of her images I chose that demonstrate what I mean :)


3. Edward Weston
What I love about Weston's images is that he does a variety of landscapes which makes his work very interesting to look at. Again in B&W but he uses this to his advantage. He incorporate intense shadows and highlights in his images to make his images more powerful. Even though I think it looks fantastic I don't plan on using that technique myself because I want to photograph in colour and that makes it difficult to achieve the same effect as Weston. Anyway, here are some of my favourites...


4. Adam Burton
What strikes me the most about Burton's images is the colour in them. It is usually based on one colour which just makes the image 'POP'. The colour is really intense and powerful and he uses colours that often provokes emotion e.g. reds and deep blues. It makes his work very different from the three other photographers I have discussed... 


Even thought I think that the technique produces amazing results if executed exceptionally well like Mr Burton I intended to use a lot of colour in my images but I won't try to use his technique of using one colour for dramatic effect.

5. Simon Roberts
What I find really intriguing about Robert's work is that he often incorporates people into his images and they are always from an outsiders viewpoint looking at them against the landscape (he is never with them). It adds  layers to his images with this interaction between people and nature. This is mainly because the images were taken from his 'We English' series so really it is as much about the people in the photographs than it is about the landscape. Unlike Burton's work, his are quite dull and dreary but it works...mainly because the lighting is still very good. His aim is to represent Britain and he has succeeded when it comes to the climate. He has in effect used landscape photography to produce a documentary series by incorporating people...


6. Joe Cornish
Something I noticed as I was looking through Joe Cornish's images is that he is OBSESSED with rock. Big ones, small ones, round ones, funny shaped ones etc.... They're usually in the foreground and he has a very large field of view, when combined with a deep depth of field, allows for a very full images with lots going on. I also noticed that to add to this effect he often took images in portrait which is an unusual aspect ratio to use for landscape photography but it definitely works! I do however intend to use landscape and a smaller field of view than Cornish.

(I really wasn't kidding when I said he loved rocks...)

Now that I have done my research I have a general idea on what I hope to achieve in this unit in realm of landscape photography...Time to plan my shoot!

Friday 14 June 2013

Matte vs Glossy


Hot topic in photography. Which paper is better: Matte or Glossy? We looked at them in class then did our own research. In order to answer the question you have to compare them...


Matte
Glossy
Finish?
Dull
Shiny
Vibrant colours?
No
Yes
Quality?
Very Good
Good
Good for v. fine detail?
No
Yes
Glare in bright light?
No
Yes
Fingerprints and dust?
No
Yes
Cost?
Expensive
Cheaper

I have come to the conclusion that different paper is better in different situations. Imagine this scenario you live in Miami where it is always sunny and you want to display photographs for an exhibition outside. Which do you choose? In this scenario you are going to choose matte to avoid glare and dust, it costs more but if you want to present them in an exhibition you should use the higher quality paper even if it cost more. No imagine this scenario you want to print a family photograph to place in a frame with glass where it will be kept inside and you live in dreary old britain. Now which would you choose? Glossy because it is cheaper and because it will be in a frame and behind glass there is no risk of getting fingerprints or dust trapped. Also no chance of glare.

PERSONALLY, I prefer matte paper because it feels better when you hold it, it looks better (the shininess of glossy really puts me off), the quality is better and I don't mind paying a little extra for it because I prefer it! 

Detailed Plan for My Music Shoot

As part of the media unit we had to do a detailed plan relating to a shoot we will do for a specific purpose. We have to make up a scenario ourselves, do the research and plan then do the shoot and present our final images. The scenario I make up for myself was this...

"The Northern Quarter is a very large part of the history of Manchester and very well rooted in its heritage as a musical city. Great have come from Manchester: The Smiths, The Bee Gees and  The Stone Roses to mention a few. Manchester City Council want you to take between 5 and 10 images they can choose from to use in brochure about the Northern Quarter for those who don't know much about the area. The aim is to generate interest in the area"

There are many questions I needed to ask myself before setting off, which included...

Will I use Film or Digital?
Digital because the way in which I plan the take the photographs is slightly candidly. I want to do it in a way that's very casual and laid back and I feel digital would be better because it would allow you to look at the photograph there and then to see if it is what you're looking for (there is a risk I would over think things if I were to do film).

Who is it aimed at?
As mentioned in the scenario, it is for people who don't know very much about the area and have perhaps never really spent time there. This affects what I photograph because there is no point going out and photographing some very specific and niche aspects of the area if they won't understand it or if it won't captivate them. This is what led me to decide that the images need to be in colour and not only that but colourFUL and lively to capture the readers attention. 

The impression we want to give is it is a lively and exciting place to be. We want to give the onlooker a sense of the area so street photography I'm thinking is appropriate because when you walk into the northern quarter before you walk into a cafe or record shop you walk down the street so I want to ensure they recognise the image when the see it/go to the northern quarter after seeing it. 

Also, because it is to do with music, our target with the brochure would be music fans so all the images must in some way link Manchester and music (so there is no point in photographing...say...a hair salon!)

How much would it cost?
Well because it is digital and not film the capturing of the images won't cost anything but I will need about £5 for transport and ranging from £5-£10 for the prints; I am going to present them as 12x8 inch prints so they can see the detail well to make an informed decision as to whether that is what they are looking for.

What settings would I use?
Well that depends on the weather and the subject. WB will be adjusting according to the light available (obviously most will be in natural light or a mixture of natural and artificial). Also shutter speed and aperture will be adjusted depending on the weather but also whether or not I want motion blur (which I don't see myself using) and whether I want shallow depth of field or deep depth of field (example...I want to do at least one wide angle shot down Oldham Street and for that I will need a high aperture etc). I will probably use Automatic Focus (seems appropriate for the assignment). The final technical aspect I need to consider is exposure. I decided to have the exposure at 0 because if it is too dark, it will appear too dreary and if it is too bright you will lose colour and detail so I decided to meet in the middle!

How will I edit them after?
Just ensuring exposure is correct and crop and rotate as needed. I also want to increase the saturation and the contrast evvver so slightly just to give the images an extra kick!

Where am I going to photograph?
ALL OVER the Northern Quarter, but mostly based around Oldham Street and Thomas Street.

How long will I spend?
Well I've been to the area before so I know it. Also I have done some street photography in town before so I think I am will equipped (don't think I really need a test shoot). I have decided I will spend most of my day there.

Now that my plan is done, I needed to do some hands on research. Me being fairly new to Manchester myself I have been down to the Northern Quarter a few times however I have never spent a substantial amount of time there so before I did the shoot I went for a brew in Teacup Cafe on Thomas street to get a feel for the general area. It was elevenses time so people had started coming in for a  cup of tea and cake or brunch. These were my observations...

  • Theme was brown,white and red.
  • So many teapots! Mostly red and white.
  • People generally in two's,a couple of people on their own but no larger groups.
  • Lots of mums with prams and children so it's a child friendly cafe
  • Happy-go-lucky type music...elevator music...I think its called Musak...even in the toilets I discovered
  • Quite a dark cafe to be honest because it only has two windows (albeit large windows) one either side of the cafe
  • Very cluttered place, gives a cosy atmosphere but borderline claustrophobic
  • Small and squeaky wooden chairs and square wooden tables
  • Friendly but busy staff.
Here are some images I took on my phone...


I've even included a video so you can see what I saw!


Looking at the research I have come up with 5 words to describe the place...
  1. Lively
  2. Quirky
  3. Traditional
  4. Welcoming
  5. Interesting!!!
I decided to use this research to mould my understanding of the area and hopefully that will translate into my images!!!

I then set out, keeping all that I've discussed in mind, taking photographs of the area. I went to  Afflecks, all the way down Oldham street, all the way down Thomas Street and down towards Lever  Street and Newton Street. I got plenty of images and when weeding out the maybes and the definite no I would refer back to the scenario and consider if it fulfils the requirements and does its function as an image for an informational brochure. I kept doing this until I was left with 7 images I was happy with. All of these fit the criteria I had set myself (Is it in the Northern Quarter? Does it represent the Northern Quarter fairly? Is it related to music? Is it vibrant? Is it accessible to all?)

I edited them in PS as I said I would earlier in the post and these are my final images...

'Cut Loose'
I included this image purely for the wonderful bright colours. They are very eye catching and in turn stimulating, which would definitely benefit the brochure and help fulfil its aim to generate interest.
Leaflets
I felt this image really represented the music scene because it included everything from a musical to a gig held in the Bohemian Grove...there was even a leaflet for ParkLife music festival. The chaos of the leaflets just strewn across the table I feel really reflects on the liveliness of the area.

Northern Quarter
This is the image I was talking about  where I wanted to do a simple photograph of Oldham Street when you enter the Northern Quarter to demonstrate what the area looks like. This again goes back to the fact that anyone can recognise this area and would relate to it this image when they see it for themselves.

Posters Galore
I felt this image  is similar to the Leaflets image. This shows the diversity of the music scene here with everything from DJs to TOTP! The posters really catch your eye because that is their purpose in the street and now that is their purpose in the photograph!

Record Shop
This image I took from the inside of the record shop. I shot through the window out onto the street. What I love about this image in particular is not just the fact that it is very much about records and about music but the records in the foreground and the reflections really add some depth and is intriguing and I feel would catch the reader's attention.

Afflecks
I included this image because the mosaic on the wall of Afflecks is so iconic that it is not a landmark in Manchester with the Manchester icons and the dragon opposite. I felt that it would lead to some interest within the article as I felt it would help them introduce this landmark.

Vinyl Exchange
I believe traditional was a word I used to describe the area...and nothing is more old school than vinyl...Am I right? This image quite simply sums up the Northern Quarter: Music and Tradition!

I thoroughly enjoyed this task as I felt that I learnt a lot about the variables and factors you need to include to produce images of a high quality. I felt that without the planning and the research I wouldn't have been able to produce images that satisfied their function outlined in the scenario. It just goes to show that the process is just as important as the images you produce!