There are specific ways you could photograph flowers to give a particular effect. To make them seem alive you can photograph them from behind. They are full of moisture and thus doesn't absorb the light (light transmits very easily).
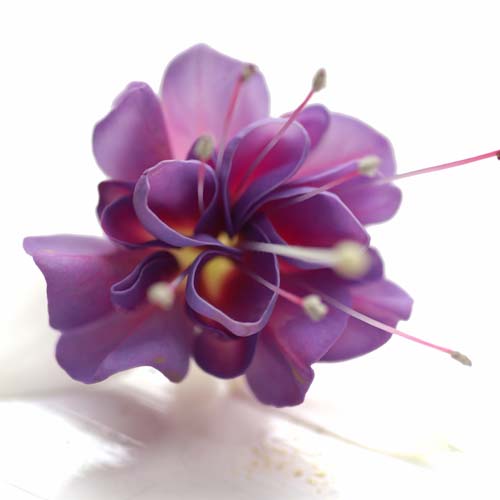
 British Flower photographer Celia Henderson uses this technique frequently (alongside other set-ups , my favourite being in her from her Fuchsia set (left)...


 British Flower photographer Celia Henderson uses this technique frequently (alongside other set-ups , my favourite being in her from her Fuchsia set (left)...
I assume she used the white background to make sure the main focus was on the flower and also to make sure that the light reaches the entire flower, she would have used a reflector (silver paper) to reflect light to the front or place a soft light on a very low setting in front of the flower.
We also used gel sheets placed on top of the lighting to change the colour of the background and add some tone. It was really interesting to see how some colours and compositions worked better than others. Here are some of the results...


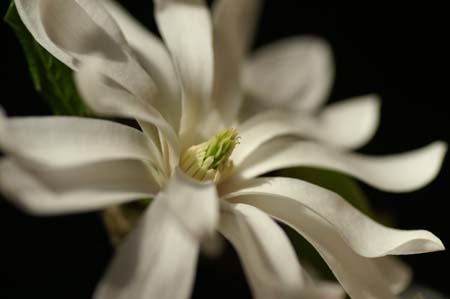
 Another effect I experimented with was the complete opposite; placing a soft box in front of the subject to give the impression it's dead. Some almost have sombre and dark ambience, called 'obscuro' style. An example of this is another photograph by Henderson from her Magnolia set (right)...
Here is my result for my experimentation with the obscuro effect...

I then decided to challenge myself by meeting halfway-give the effect of being alive without placing a light behind. After many failed attempts (ended up being over exposed ☹) I was able to do satisfy this to a level I was happy with...Here is lighting diagram of the lighting set-up...


With these I think that the orange background itself works better because it helps the flower stand out more, at the same time the pink background helps the tones of the flower so the flower in the pink background image is better!


With these two I felt that different effects can be given with the same composition and same photograph (well almost the same!) taken by the camera. They are two very different photographs-the one on the left is quite sinister whereas the other radiates hope and optimism!!!


Similarly to the last set, these just go to show that with the exact same composition and by changing something as subtle as the gel sheet colour, it can give the effect of different times of day (left=early morning, middle=midday, right=night) and thus changes the entire atmosphere of the photograph.
 Another effect I experimented with was the complete opposite; placing a soft box in front of the subject to give the impression it's dead. Some almost have sombre and dark ambience, called 'obscuro' style. An example of this is another photograph by Henderson from her Magnolia set (right)...
Here is my result for my experimentation with the obscuro effect...

I then decided to challenge myself by meeting halfway-give the effect of being alive without placing a light behind. After many failed attempts (ended up being over exposed ☹) I was able to do satisfy this to a level I was happy with...Here is lighting diagram of the lighting set-up...

I tried using a reflector just to the right of the camera (between it and the soft box) however I felt that it took away some of the shadows nearer the middle of the flower and I liked the shadow because it gave the flower some tone. Et Voilà the result of my experimenting...

I chose this arrangement because I liked the contrast between the two plants-ones very large and colourful whereas the flowers on the other are slightly more dull but because there were more it was very interesting. I place the pink flower in front because at the end I wanted it to be the main subject.
I decided the 'alive' technique might not have worked so well with this composition because the pink plants' colours are so bright and bold that I felt that the colour would be diluted if it were too bright and alive. I decided to place them on a wooden block because I felt it added a little texture and thus some character.
I found that lighting the subject from the side and placing the flowers at a slight angle I was able to aptly light the composition without compromising the challenge I set for myself. A criticism however is the background has then become too dull so perhaps this set-up would have been better to give a white background...


